
EF Core: Managing entities, configurations and migrations
We all yearn for clean code and a clear folder structure, in the effort to make navigating through the code and managing assemblies easy. With the advent of EF Core as an ORM and the code-first approach, the dreaded management of ever-growing migration files along with the entities is something that has given nightmares to almost everyone.
It is not just the migrations but also the configurations of constraints, indexes, etc. on the entities that add to the chaos and responsibility of the project managing it all. Therefore, here we are going to discuss the latest and greatest ways (as of right now, .NET 6.0 and EF Core 6.0) to separate the concerns and manage them all.
Objectives
The objectives of the document are to provide for direction to manage the following:
- Entity configurations - constraints, indexes, master data, etc.
- Separating migrations from the entities
- Create migrations without an actual database
Implementation
In the general development and deployment, we try to move things to the left, i.e. get early feedback. Hence, deployments should get performed by CI/CD, over any infrastructure we have in-picture on a project, before the application is deployed instead of when the (first or each) call to the database is made; which is a quite common thing with EF.
You can access the entire code from my GitHub Repo
Solution Structure
As we are trying to segregate the responsibilities of the assemblies to manage the code better, therefore categorizing the projects into Applications and Infrastructure. Here we create a couple of class-library projects namely DataAccess to house the entities and configurations and DataSetup to house the migrations (both C# and sql) which can be used during the deployments to migrate database per environment.
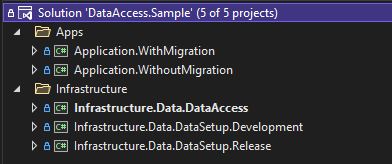
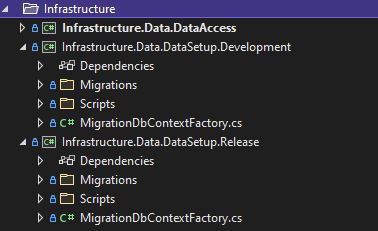
- Infrastructure
Infrastructure.Data.DataAccess- This project houses the actual entities and configurations like indexes, master data, entity defaults, etc.Infrastructure.Data.DataSetup.Development- This project houses the migrations for the development environment.Infrastructure.Data.DataSetup.Release- This project houses the migrations for the release environment.
- Sample Applications
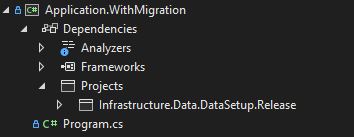
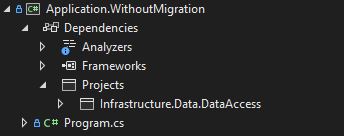
Application.WithMigration- This is the application project that uses the migrations in the traditional sense, which can migrate the database with EF Core.Application.WithoutMigration- This is the application project that assumes there is a separate pipeline that runs the migrations on the database, and we are just running the application with the data context.
Data Access Project
As I have noticed, we keep building on the configurations in the OnModelCreating method in the DbContext file. This over time becomes quite unmanageable and unmaintainable as it grows out of proportion based on the sheer number of tables and configurations in a commercial application.
Therefore, we will be exploring a new construct here and segregating the configurations from the models and context file, thereby allowing us to write cleaner manageable, and extensible code. With this, we will be moving all the configurations for an entity in the Configurations folder and not collude the actual model or the DbContext file.
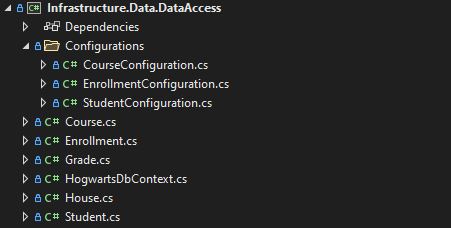
Entities
As we can see all the entities have been set up in the DataAccess project and there is an additional folder there for the Configurations. Let us first create the entities required for any setup further, creating a Student entity for example over here. We would also need to refer to the following packages from NUGET to continue in the DataAccess project, which are the latest as of right now.
- Microsoft.EntityFrameworkCore (6.0.1)
- Microsoft.EntityFrameworkCore.SqlServer (6.0.1)
public class Student
{
    [Key]
    [DatabaseGenerated(DatabaseGeneratedOption.Identity)]
    public Guid StudentId { get; set; }

    [Required]
    [MaxLength(50)]
    public string FirstName { get; set; }

    [Required]
    [MaxLength(50)]
    public string LastName { get; set; }

    public House? House { get; set; }

    [Required]
    [Range(1, 7)]
    public int Year { get; set; }

    public virtual ICollection<Enrollment> Enrollments { get; set; }
}
Configurations
Once the entities are set up, we are moving the configurations that would have originally resided in OnModelCreating method on the Database Context class. With this, the context file itself becomes cleaner and does not need to know about the individual configurations thereby reducing its complexity and maintenance effort.
public class HogwartsDbContext : DbContext
{
    ...
    protected override void OnModelCreating(ModelBuilder modelBuilder)
    {
        modelBuilder.ApplyConfigurationsFromAssembly(typeof(HogwartsDbContext).Assembly);
    }
    ...
}
I prefer loading all the configurations at once via the assembly, but we could load each of them one by one.
Now, since we have loaded the all available configurations in the assembly, we need to define those for the entities as well. We can see above in the Student entity, we have used a GUID as an identifier and wish to auto-create that when the record for the entity is created. So, leveraging the IEntityTypeConfiguration<T> interface available to us, we can now do something like the following thereby segregating it all into modular, manageable, and readable configurations.
public class StudentConfiguration : IEntityTypeConfiguration<Student>
{
    public void Configure(EntityTypeBuilder<Student> builder)
    {
        // Setup Defaults
        builder.Property(x => x.StudentId).HasDefaultValueSql("NEWID()");
    }
}
Using the very same strategy we can create and manage indexes, and master data as you would be able to see in other configuration classes like this.
// Setup indexes for Enrollments in Enrollments Configuration
builder.HasIndex(b => new { b.CourseId, b.StudentId }, "IX_Course_Student");

// Setup master data for Courses in Courses Configuration
builder.HasData(
            new Course() { CourseId = new Guid("578C9088-D00D-421F-B418-BB3E305FA32F"), Credits = 5, Title = "Defense Against the Dark Arts", Year = 1 },
            new Course() { CourseId = new Guid("24E42CE8-6D38-4C5D-88E8-8310935BD886"), Credits = 2, Title = "Alchemy", Year = 2 },
            new Course() { CourseId = new Guid("680B9BD7-CAE9-4126-9B22-2C700FBAB340"), Credits = 3, Title = "Beasts", Year = 3 });
Though they could be all clubbed in a single configuration file, I recommended creating a configuration file per entity and having more visibility and ease of management.
Data Setup
Now, comes the twist from the general practices we follow and the most crucial part in creating a clean data access layer, i.e. managing it all in multiple projects. So, what I am going to do is set up not one but two setup projects, one for Development and the other for Release. Both of them could maintain different versioning strategies, number of releases, etc. based on the requirements. But before we continue, let’s look at the dependencies required for setting up the projects, again the latest packages available as of right now.
- Microsoft.EntityFrameworkCore.Design (6.0.1)
- Microsoft.EntityFrameworkCore.SqlServer (6.0.1 - Optional, as we would need to refer DataAccess project which already has it)
Database Context Factory
The next step would be the only most important thing, setting up a database context factory for each project. We would be leveraging the following things in the recent versions of EF Core for achieving our objectives:
- Provision for an interface
IDesignTimeDbContextFactory<DbContext>which lets us define a context factory. - Extension for the
UseSqlServermethod to have a non-mandatory connection string parameter
public class MigrationDbContextFactory : IDesignTimeDbContextFactory<HogwartsDbContext>
{
    protected virtual string AssemblyName {
        get => "AnimatLabs.Infrastructure.Data.DataSetup.Development";
    }

    public HogwartsDbContext CreateDbContext(string[] args)
    {
        var contextOptions = new DbContextOptionsBuilder<HogwartsDbContext>()
            .UseSqlServer(x => x.MigrationsAssembly(AssemblyName)).Options;
        return new HogwartsDbContext(contextOptions);
    }
}
Migrations
As we can see in the code snippet above, we did not need to provide a connection string but had to add a parameter defining which assembly contains the migrations, this is what directs the context where to look for the migrations. And then the rest is just the magic of dotnet ef commands with which perform all the wonders for us.
With two different projects for migrations, the main case I am trying to cater to is that there might be multiple releases on a development server, but we might wish to release or create migrations once in a while when things are stable or any other valid reason.
Run the following command from the root folder, and it now creates the migrations in the project specified with the -p flag.
# Initial Migration
dotnet ef migrations add dev.1.0.0 -p src/Infrastructure.Data.DataSetup.Development

# Subsequent Migration
dotnet ef migrations add dev.1.0.1 -p src/Infrastructure.Data.DataSetup.Development
In a very similar way when we have to generate the migrations for release then we can run the following command, from the root folder:
dotnet ef migrations add v1.0.0 -p src/Infrastructure.Data.DataSetup.Release
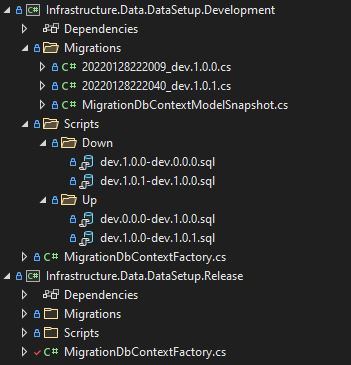
Scripts
As we are thinking about production-ready code, we also need to be aware of the risks of the strategy. Therefore, quoting a section from the Microsoft documentation.
Whatever your deployment strategy, always inspect the generated migrations and test them before applying them to a production database. A migration may drop a column when the intent was to rename it or may fail for various reasons when applied to a database.
Because of this, the scripts shouldn’t just be generated on the fly on the pipelines and implemented at the data centers. Hence, you could maintain the scripts along with the migrations in the repo itself, and it would be the responsibility of the DevSecOps to generate, review and version control them accordingly. For the sake of this example, I will be generating scripts that move the database both up and down per migration.
Important point to note, I will be using the
-iflag (idempotent) to generate the scripts, so that we can run all the scripts if we want at any given time without worrying about whether they would break or not.
Up
To generate the first Up script we would use the following command, which generates the script in the output directory specified in the command with the -o flag.
# Initial Scripts
dotnet ef migrations script -i -p src/Infrastructure.Data.DataSetup.Development -o src/Infrastructure.Data.DataSetup.Development/Scripts/Up/dev.0.0.0-dev.1.0.0.sql
Thereafter, to generate the following scripts, we can specify the version from which we wish to generate the scripts from and to and use the following command.
# Subsequent Scripts
dotnet ef migrations script dev.1.0.0 dev.1.0.1 -i -p src/Infrastructure.Data.DataSetup.Development -o src/Infrastructure.Data.DataSetup.Development/Scripts/Up/dev.1.0.0-dev.1.0.1.sql
Down
Just like we generated the Up scripts, we can generate the Down scripts specifying the from and to in the reverse order.
# Initial Scripts
dotnet ef migrations script dev.1.0.0 0 -i -p src/Infrastructure.Data.DataSetup.Development -o src/Infrastructure.Data.DataSetup.Development/Scripts/Down/dev.1.0.0-dev.0.0.0.sql

# Subsequent Scripts
dotnet ef migrations script dev.1.0.1 dev.1.0.0 -i -p src/Infrastructure.Data.DataSetup.Development -o src/Infrastructure.Data.DataSetup.Development/Scripts/Down/dev.1.0.1-dev.1.0.0.sql
The final structure for the and the application would look something like this:
Applications
Now, coming to the good part, how do we consume what we have made so far? For the purpose of this, we are going to explore two ways in which we could probably consume it.
Conventional
In the conventional style, we will be looking at migrating the database directly from the code (we could still use this way of segregation). To begin with, we add a reference to the development or release version of the migrations, how so ever we wish to continue on the project as shown in the image below as well.
Now, is the time to work our magic with the code in Program.cs, where it would look something like this:
var connectionString = "Server=localhost;Initial Catalog=HogwartsDb;Integrated Security=True;";
var migrationAssemblyName = "AnimatLabs.Infrastructure.Data.DataSetup.Release";
var contextOptions = new DbContextOptionsBuilder<HogwartsDbContext>().UseSqlServer(
    connectionString, x => x.MigrationsAssembly(migrationAssemblyName)).Options;
using var dbContext = new HogwartsDbContext(contextOptions);
    dbContext.Database.Migrate();
    foreach (var course in dbContext.Courses)
        Console.WriteLine(course.Title);
If we observe closely above, we built the database context options with the actual connection string to the database and the migration assembly name and performed migration on the very first call that we made to the database, or how the migrations are done on conventional bases.
CI/CD Centric
In this style, we pre-assume that the scripts we generated above have been executed either by the pipelines or any other way, but before we deploy the application. Therefore, there is no need for us to have migrations loaded into the actual application and for the same reason, you would see that the project refers to the DataAccess project and no reference for migrations exists!
The code for connecting to the database remains fairly the same with a few differences as follows:
var connectionString = "Server=localhost;Initial Catalog=HogwartsDb;Integrated Security=True;";
var contextOptions = new DbContextOptionsBuilder<HogwartsDbContext>().UseSqlServer(connectionString).Options;
using var dbContext = new HogwartsDbContext(contextOptions);
    foreach (var course in dbContext.Courses)
        Console.WriteLine(course.Title);
Again, if we observe closely and compare it with the conventional setup, we see that there was no migrating assembly required while generating the database context options and no need to perform migrations as well, thereby keeping it simple and light.
Pros & Cons
Almost nothing comes without pros and cons, and they should be weighed in before we accept or reject a possible way of doing things. Therefore, presenting the pros and cons I figured during developing the projects in the above way.
Pros
- No startup/setup required
- No need for an actual sql database to generate migrations
- Separation of concerns
- Easy to maintain
Cons
- Build the entity project mandatorily, before generating migrations else they won’t reflect in migrations
- Cannot remove migrations without an actual database
Comments