
WSL2 Installation Guide: Set Up Linux on Windows 10 and 11
Introduction
Being associated with software development, we all have worked with a terminal at some point in time. And what better than Linux when it comes to that, be it developer and community support, be it the speed or simplicity? But, if we work in a personal/commercial setup, we might just have access to a machine with Microsoft Windows on it. Thereby limiting the options, either installing Ubuntu on dual-boot or setup a VM within the windows machine, but both have quite a few pros and cons and might or might not be feasible for everyone.
In the past, Microsoft brought in support for Linux within Windows OS with Windows Subsystem for Linux (WSL). With this, a dual-boot where we lose access to elements of Windows environment or a VM that potentially uses way too many resources of your machine. In this article, we will be talking about setting up WSL with Windows 10/11 and setting up a basic environment.
Configuration
WSL vs WSL2
As of right now, Microsoft has already launched WSL2 which is a major overhaul of the underlying architecture and uses virtualization technology and a Linux kernel to enable new features. The primary goals of this update are to increase file system performance and add full system call compatibility. For more details, refer to this documentation.
WSL
- Minimum System Requirements
- Windows 10 version 1607 or above/Windows 11
- Only 64-bit Windows 10/Windows 11 is supported
- Required Windows Features
- Windows Subsystem for Linux
WSL2
- Minimum System Requirements
- For x64 systems: Version 1903 or higher, with Build 18362 or higher.
- For ARM64 systems: Version 2004 or higher, with Build 19041 or higher.
- Builds lower than 18362 do not support WSL 2
- Required Windows Features
- Windows Subsystem for Linux
- Virtual Machine Platform
Setup
For my setup, I would be using Windows 11 and setting the WSL2, you may choose to go with WSL based on your requirements and available environments.
-
Enable Windows Features - We can enable the windows features in 2 ways, either via CLI or GUI. You may have to restart your system after installing these for all configurations to be in place.
-
Option 1 - Via Powershell CLI as Administrator
dism.exe /online /enable-feature /featurename:Microsoft-Windows-Subsystem-Linux /all /norestart dism.exe /online /enable-feature /featurename:VirtualMachinePlatform /all /norestart -
Option 2 - Via GUI - Windows Features
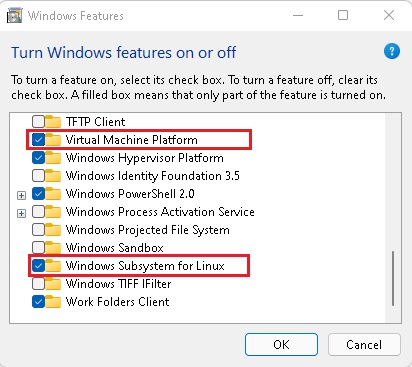
Windows Features -
-
Set WSL2 as default - To enable WSL2 we need to open Powershell as Administrator and execute the following command.
wsl --set-default-version 2 -
Checking WSL versions installed - We can use the following command to check for the distros installed in WSL.
wsl -l
WSL Fresh Installation -
List Available Versions (Optional) - WSL provides the user to install from the various flavors supported, if you wish to see the same you can list the same with the following command.
wsl --list --online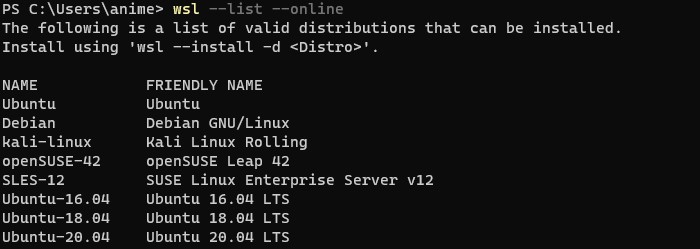
WSL Available Distros -
Installing Ubuntu - For the demo, I would be setting up the latest version of Ubuntu, and am yet again going to use PowerShell for the same. We could also do this operation via GUI installing the Ubuntu app from the Windows App Store.
wsl --install -d Ubuntu
WSL Installing Ubuntu After this, we see another screen pop-up which is the actual Ubuntu machine asking for the required configurations such as username and password. You get added to the list of sudoers by default and can run Sudo commands using these credentials as well. Once you set up these, you would get the
$prompt and Voila!! You are all set up and ready!!
Ubuntu Setup Completed -
Check Ubuntu’s WSL Version - You can check the version of the operating systems installed with the following command.
wsl -l -vIf the version of the OS is, not 2, you can change the same using the following command:
wsl set-version Ubuntu 2You might face the following issue when trying to update the WSL version in windows 10, WSL 2 requires an update to its kernel component. For information please visit https://aka.ms/wsl2kernel. If so happens, you need to do the following:
- In PowerShell, we need to run the following:
wsl --shutdown - Download the latest respective arm/x64 kernel from here
- Extract the content cab file and install the package
- Go back to the PowerShell and start wsl again
wslThis should do the trick and you should be able to run the
set-versioncommand again and it would get converted.
- In PowerShell, we need to run the following:
-
Update and Upgrade Ubuntu (Optional) - If you wish to update and upgrade the packages installed on Ubuntu in general, you can use the following to do the same.
sudo apt-get update && sudo apt-get upgrade -yAlthough not generally, we might face an issue with WSL2 that we are not able to connect to the internet to download the packages when we do so, to fix the issue we add the following to the
/etc/resolv.confsudo echo nameserver 8.8.8.8 > /etc/resolv.confAgain, it might be possible that this change does not hold with WSL2 and is overwritten, and is a known issue. Therefore, to make it permanent we can do the following:
sudo rm /etc/resolv.conf && \ sudo bash -c 'echo "nameserver 8.8.8.8" > /etc/resolv.conf' && \ sudo bash -c 'echo "[network]" > /etc/wsl.conf' && \ sudo bash -c 'echo "generateResolvConf = false" >> /etc/wsl.conf' && \ sudo chattr +i /etc/resolv.conf -
Installing Windows Terminal (Optional) - Although not required, my personal preference is inclined towards using Windows Terminal, which can be installed via the App Store. It gives you the capability to work on multiple terminals in multiple tabs on a single application. Additionally, i can configure it to open Ubuntu as the default tab.
Note: When we open wsl, by default we log in at our windows’ user home location, whereas I prefer to use Linux users’ home rather than Windows user. Therefore, by making the following configuration in the settings section (Open by pressing
Ctrl+,and selectingUbuntuconfiguration) on the Windows Terminal, you can always open a new terminal directly at your Ubuntu Users’ home. Ex: My user isanimeshtherefore the path I would be setting is\\wsl$\Ubuntu\home\animesh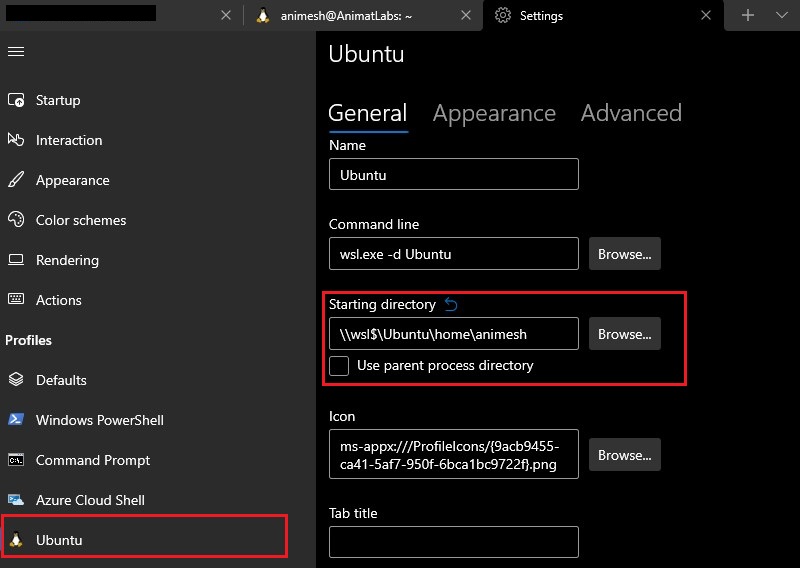
Ubuntu Home Setup Now, we can enjoy all the goodness in the world of Linux in Windows itself…
Uninstallation
If for some reason we need to uninstall/remove any os from the machine, we need to do the following steps:
-
Find the exact name of the distro you wish to remove from the ones installed
wsl -l -v -
Terminate the distro, this will shut down the OS in WSL. Please note, we need to give the name as in the list above
wsl --terminate Ubuntu -
Unregister the distro, this will remove any associated filesystem and remove the WSL entry. Please note, we need to give the name as in the list above
wsl --unregister Ubuntu
Comments